Loading... > 转载自:https://www.ywbj.cc/?p=160 vpn有ss5 ,ssr, v2ray, trojan等方式,这里介绍最简单的ss5搭建方式 ssr搭建参考:[centos脚本搭建SSR](https://www.ywbj.cc/?p=45) v2ray搭建参考:[v2ray最强搭建](https://www.ywbj.cc/?p=114) ss5官方网站:[http://ss5.sourceforge.net](http://ss5.sourceforge.net/software.htm) 默认下载资源:[https://sourceforge.net/projects/ss5/files/](https://sourceforge.net/projects/ss5/files/) ## 1:安装扩展 ``` yum -y install gcc gcc-c++ automake make pam-devel openldap-devel cyrus-sasl-devel openssl-devel ``` ## 2:下载ss5安装包 最新版为3.8.9-8版本,在2013已停止更新。 ``` wget https://jaist.dl.sourceforge.net/project/ss5/ss5/3.8.9-8/ss5-3.8.9-8.tar.gz ``` ## 3:解压并进入目录编译安装 ``` tar zxvf ss5-3.8.9-8.tar.gz cd ss5-3.8.9/ ./configure && make && make install ``` ## 4:给ss5添加权限,并加入服务 ``` chmod +x /etc/init.d/ss5 chkconfig --add ss5 ``` 这时,可以用syetemctl 启动停止查看服务状态了 ## 5:配置用户模式 修改为密码验证模式 ``` vi /etc/opt/ss5/ss5.conf ``` 内容为 ``` auth 0.0.0.0/0 - u permit u 0.0.0.0/0 - 0.0.0.0/0 - - - - - ``` 如果无需验证,则将 u 改为 – 即可 ## 6:设置用户账户密码 ``` vi /etc/opt/ss5/ss5.passwd ``` 第一行用户,第二行密码 ``` chin 12345 chin1 123456 ``` ## 7:设置登录端口 ``` vim /etc/sysconfig/ss5 ``` 将#SS5_OPTS=” -u root” 注释取消,改为自定义端口,这里以9369为列 ``` SS5_OPTS=" -u root -b 0.0.0.0:9369" ``` ## 8:启动ss5查看并验证 ``` systemctl start ss5 ``` 启动后 `netstat -lntup|grep 9369` 端口已经启动 [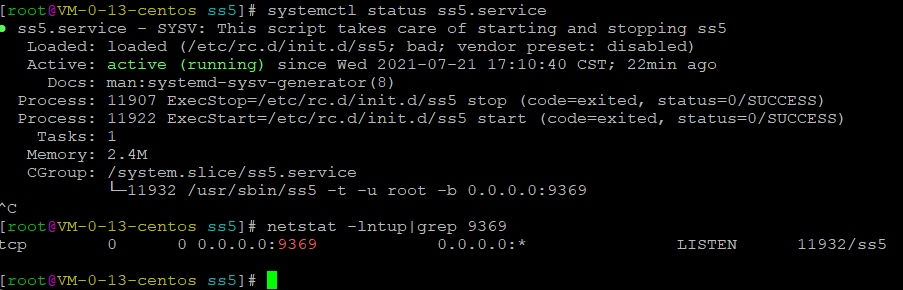](https://www.ywbj.cc/wp-content/uploads/2021/07/8c37c791c84e3c218118408443072c6c.png) ## 9:在客户端设置检查 软件为Proxifier,官方下载地址:[https://www.proxifier.com/download/](https://www.proxifier.com/download/) 如果国内打不开,可自行找资源下载。 安装后,在”配置文件>>代理服务器>>添加“,自己填入IP,端口,选择ss5版本,填入账号密码,最后检查通过即可,默认测试设置是检查www.google.com网站,可以修改为百度或者其他网站即可。通过确定。 [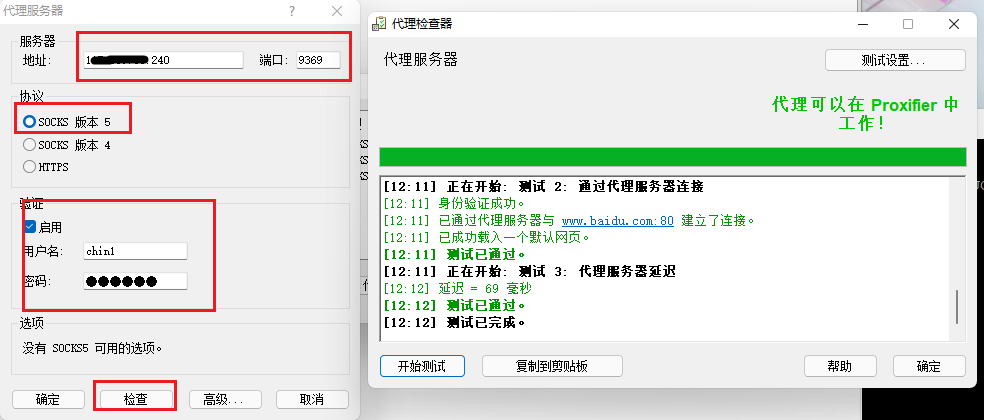](https://www.ywbj.cc/wp-content/uploads/2021/07/1fa52f60f292078f8c624de6f3981f56.png)最后在 ”配置文件>>代理规则“,中把 `Direct` 选择为你要的服务器即可使用配置的代理。百度输入IP也可以查看自己当前IP是否切换。 最后修改:2022 年 02 月 22 日 03 : 35 PM © 允许规范转载 赞赏 要多恰饭才能长胖 赞赏作者 支付宝微信
